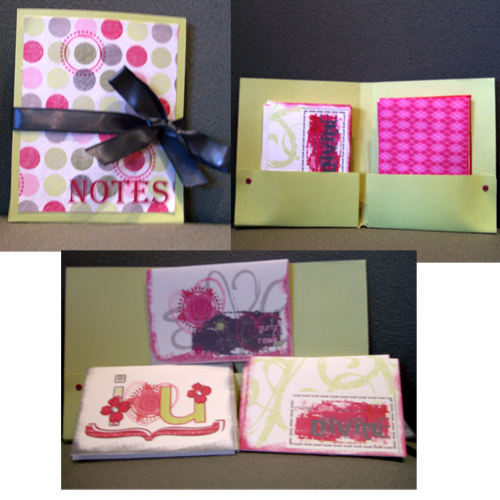
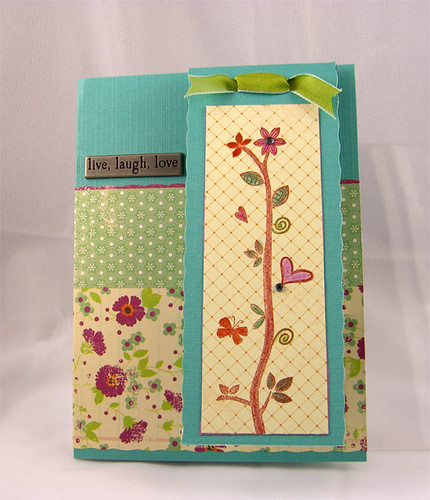
Sunday, October 26, 2008

Bookmark Birthday Card


Inside of bookmark for B'Day Card.
Front of CardInside of Bookmark

Bookmark B'Day Card inside and envelope

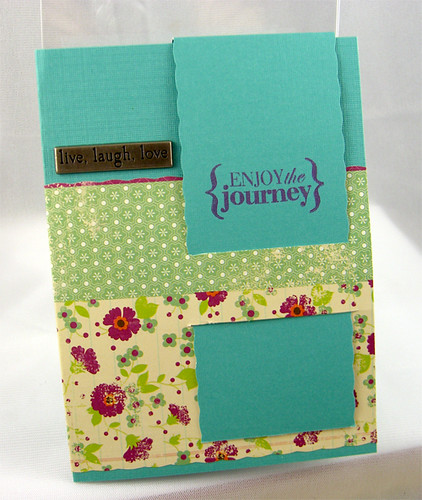
Inside of Card with Envelope.


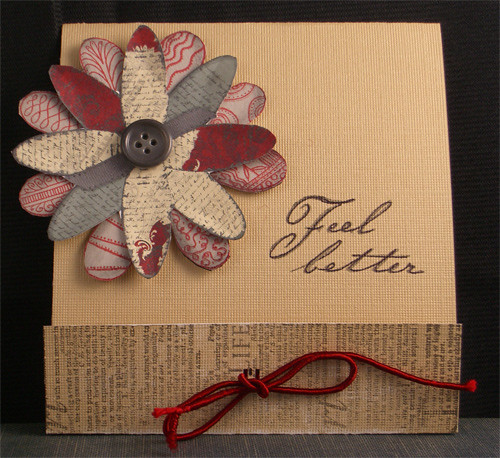
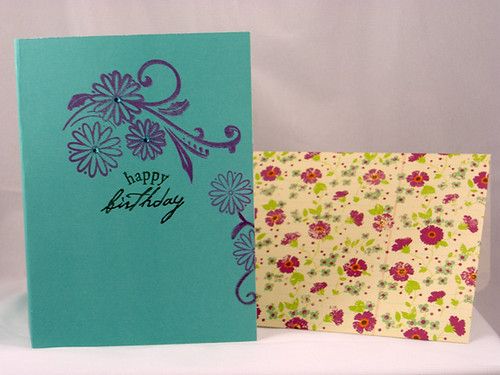
I made this card for my mom for her birthday. She loves to read books. She always has a stack of paperbacks for me to read every time I visit. So basically I never have to buy any paperback novels. How great is that!!

For her birthday (Mom stop reading now!) I bought a number of paperbacks that have just been released. I doubt she has read them, because she always buys them at the discount center or second hand shop. Nothing like a gift that gives back (shameless I know).

Back to the card. I saw this idea on the Hero Arts Blog and decided to make my own. Here are my ingredients:

Stamp Sets (all Hero Arts (HA))
CL150: Heartfelt Messages
CL219: Birds and Branches
CL146: Travel Journal
Inks
Versamark Amethyst
Versamark Brown
Black ink
Other -colored pencils
Embellishments
HA gemstones
Making Memories metal sentiments
Paper
Making Memories Noteworthy
other random cardstock


The bookmark idea was from one of the videos on the HA blog. I snagged the video off of YouTube. Watch below:

Thursday, October 16, 2008

Halloween Nugget Box


Nugget-Box, originally uploaded by scrapmavin1.

I made another little gem with the Spookalicious Kit from Divine Digital. This little gem is way less fattening than the previous post! It only holds 4 nuggets, which I believe is only about 211 calories. Probably better for all, especially the little goblins who need to go to bed at night.

Details: I used a white paint pen on the acetate so graphics would show up better. I cut the paper to cover the nuggets to 1" by 3.125". Apparently you can use Avery labels (1" x 2 5/8", 5160 or similar). Pattern for the box can be found here.

Halloween Treat Boxes


Treat-boxes, originally uploaded by scrapmavin1.

I used the Spookalicious Kit from Divine Digital to create the little medallions. The kit is filled with cute Halloween motifs for kids of all ages.

To make these boxes, I first scaled the critters down in MS Publisher to about 2.125". I then printed and punched the critters out with a 2.25" circle punch. I made black scallop circles measuring 2 7/8". The box top and bottom are made of cardstock. The center portion is acetate. I created the boxes following the directions on a blog from Split Coast Stampers. I

Note: These are calorie intensive boxes! Each one takes about 10 oz of chocolate kisses. I'm trying to make the box a bit smaller. When I work out all the details I'll post the instructions.

Sunday, October 5, 2008

Holiday Coasters


Holiday Coasters, originally uploaded by scrapmavin1.

I made the coasters for the "Deck The Halls" contest on the Hero Arts blog. The coasters were so easy and inexpensive to make. I think I paid about 47 cents per tile. I plan to make a bunch for the holidays for last minute gifts to have on hand. The stamping/coloring for all four took about 45 minutes. I usually spend twice that on a card. I have to admit I was inspired, so I didn't have to spend the first 45 minutes thinking about what to stamp.

Stamps Used:
E2603 Trees With Bright Stars (Hero Arts)
LL046 Wavy Winter Wishes (Hero Arts)
Happy Holidays Studio G
Inks and Markers
Staz-on:Jet Black, Versa Magic: Red Magic
Marvy Markers
Krylon Crystal Effects
Agora Almond Tiles (4" x 4") From Lowes

Thin cork or felt for backing
Other useful items: baby wipes (not the oily kind!), paper towels, rubbing alcohol, blow dryer or heat embosser


Directions:

  1. Wash and Dry your tiles to remove any dust. I dried my tiles off with my heat embosser.
  2. Stamp your design on your tiles (I used Versa Magic and Staz-on). After each image I hit the tile with a blast of heat from the embosser.
  3. Color in your design with Marvy Markers or similar. Hit it with heat form a blow dryer or heat embosser.
  4. If you make a mistake with the Staz-on, you will need to use rubbing alcohol to remove it. Versa Magic only requires a baby wipe. In either case, remove the mistake before hitting it with heat.
  5. Stick your tiles in the oven. Set the temperature to 350 degrees farenheit. When the oven reaches 350, set your timer for 30 minutes. When they have baked 30 minutes, take the tiles out and let them cool.
  6. Once cool, spray with Krylon Crystal Clear. Spray in a well ventilated open area. I put up a box shield so it didn't get all over everything. Let dry.
  7. Repeat step 6, 3-5 times to get a good protective coating.
  8. For the backing I used Cork with adhesive that I found at the hardware store.
If you try it, let me know how it works out. Also, apparently Krylon has a new acrylic coating that only takes about 2 coats rather than the 5 I did. It is called Triple Thick Glaze. If you try the new glaze, leave a comment and let me know how it works out for you.

Wednesday, October 1, 2008

Posh Princess


posh, originally uploaded by scrapmavin1.

No, I'm not a princess. I am however part of Studio RA's creative Team. I wasn't sure how I felt about having my bio up on Facebook. I try to maintain a low internet footprint. After the introduction of Zigg, I might just have to use HTTP Tunnel Pro more often. HTTP Tunnel Pro effectively blocks your IP address from any site you view. If you want to get an idea of your footprint log on to Ziggs, or at the very least Google yourself.

To see complete Digital Credits click on the photo above. It goes without saying: Do not take my work or anyone else's and use it as your own without proper credit.

Bottle Toppers

champagne-bottle-topperwine-bottle-tag

The bottle toppers could be used for any long neck 750 ml bottle. Here are some quick instructions to create your own:

  1. Cut a piece of cardstock measuring 11" x 3.5" wide
  2. Score at 2.5" from the top of the long end. (The score line will be 3.5" in length)
  3. Punch or cut a hole aproximately 1.25" in the diameter (for some bottles the hole may need to be wider). Centered above your score line (between the top of your card stock and the score line)
  4. Decorate as you like. Click on the images above to get a description of the materials and stamps used for each topper.

Sunday, September 21, 2008

More Cards


cards, originally uploaded by scrapmavin1.

I made 2 cards using 2 different Studio RA Kits. Here is the full description for each card:
Paris Card
kit: French Flea Market Frenzy 02
Tag: Club Scrap
Stamps: Cavallini Paper Co.
Holiday Card:
kit: "Deck the Halls"
Created by Royanna Lea Fritschmann
Stamps: Club Scrap

I really love how the Eiffel Tower prints out from Royanna's kit. Just like a lithograph! I could have taken it a step further and distressed or antiqued the print, but time is not on my side right now.

Note: Ink jet prints give a more matte quality than do laser printers. Use this difference to your advantage :).

Hybrid Cards with Studio RA


feelbetter, originally uploaded by scrapmavin1.

Feel Better Card

I made this card using French Flea Market Frenzy from Studio RA and Hero Arts stamps. The flower is composed of a Hero Arts Flower stamp (bottom piece) topped off with a Flower from the Studio RA Kit. The card is "Matchbook" style. I used my handy dandy "Score-Pal" to get the edges just right. I just got the Score-Pal and I honestly don't know how I got by with out it!


Sunday, August 3, 2008

Notecards and Folder


Notecards and Folder, originally uploaded by scrapmavin1.

I made this cute little set of note cards and folder using "My Gurlz All That" digital scrap kit by Royanna Fritschmann. On sale for only $1.00, who can resist!

The "Notes" is your basic Algerian font found on most PCs. I think it works well with the kit. My note cards are 3.25" by 5.0". I made the portfolio from 8.5" x 11" cardstock. I followed a tutorial video from Dannie G for making the portfolio. My cards were a little smaller, therefore I cut the width of the portfolio down to 10.5". I made the size adjustment after cutting out the portfolio. It was easier that way and the paper waste was negligible. Here is Danni's video:


For the envelopes I used the program from Red Castle, Printing a sheet of envelopes. Make sure the envelope size is at least 0.25" greater for the width and length. Enjoy and post your links to your creations in the comments. I'd love to see them!

Tuesday, July 22, 2008

Mini 3x3 Cards with envelopes and box holder


sophmama_cardbox, originally uploaded by scrapmavin1.

I made these quick 3"x3" cards with envelopes and holders from this great little design I saw on Mel Stampz blog. I won't repeat the instructions, because they are fully described on Mel Stampz blog, as well as a pocket book variation.

I did not cut out the envelopes or the box with scissors. I used the templates found on Mel Stampz's blog and converted them to Klic'n'Kut templates. Download links at the bottom of this post. Note: The red lines are folds, so use the cut by color setting. Emboss the red, cut the black.

I then used the Sophisticated Momma kit from RA Studios at Divine Digital for the letters, box and Thanks mat. A hint about cutting the letters: It helps if you stroke the letters with a 15px black line in your image software.

The stamps I used were from Hero arts and Club Stamp. Have fun!


Box Klic'n'Kut template
Envelope Klic'n'Kut Template

Sunday, July 6, 2008

Little Boy Thank You Cards


I am now on 2 wonderful design teams, Selena Neal ( DigiSkrapnMomma) and RA Design studios (Royanna Fritschmann). The cards shown above are some quick hybrid cards I whippped up from the Royanna's "I'm sooo rusted" kit. I thought the kit was perfect to make some quick Thank You cards for a little boy I know.

My husband actually helped me enhance the idea by reminding me how much he liked comic books when he was a kid. The last card in Purple is hard to see, so I put the digital mock up above and have a freebie piece from the card for you to grab below. Clicking on the mock-up above will reveal hints on how to recreate the card. I followed a wonderful tutorial in Photoshop User magazine for a Lichtenstein type effect to create the Pop Art freebie. I'm planning on using this tutorial for a variety of other effects. Well that is all for now.


Download Link

Sunday, June 22, 2008

Tips and Tricks for those Starbuck Templates


  • Not all of the templates are created equal. I downloaded one off one site and found it to be a bit narrow and too short. Therefore it is best to do a test print on plain paper. Cut the template out and put it in the mug to see the best orientation of the template and whether the template's sizing is correct.
  • Most times you can scale the template 5-10% one way or another without any weird effects happening. Just remember in your graphic's program to scale the x and y equally. In Photoshop, with the selection arrow selected and the correct layer, you hold down the shift key (on Windows) and drag.
  • For insertion and removal of the insert, a good pair of tweezers are really helpful.
  • Pre- roll your template before insertion, especially if you've printed on cardstock.
  • On the mugs with a tight fit I would not use extremely heavy card stock. I used stock made for brochures, announcements, and posters. The weight of the paper was 67lbs.
  • The insert I made with the Retro Funk Kit shown above was printed on 8.5 x 11 paper.

You can purchase the Retro Funk Kit and/or the inserts; there is a complete set for June through December (December not shown in the above picture) at Divine Digital. Each month includes a calendar. A quick way to enjoy a cup of joe and know what day it is without having to get out the Blackberry. BTW the bird is not included :). Also check out DigiSkrapnMomma's blog, the designer of the Retro Funk Kit, for freebies and product updates.

If you are not sure how to use these type of Quick Pages; here are a couple of quick tutorials for Photoshop, Photoshop Elements and Paintshop Pro.

Saturday, June 21, 2008

Introduction

I finally decided to start a blog about digital scrapbooking and hybrid crafting. I've been hybrid crafting for 11 years now. I started out using Photoshop and Illustrator in my primary job and then moved on to using it in crafting. It started out as pure laziness and thriftiness (Can you say cheap?). I needed more wording than I had rubber stamps, and I could never line those pesky alphabet stamps up correctly. So I can hear you saying, that's great, what am I going to get out of reading your blog. Well folks here is my list:
  1. Some hopefully sage advice about hybrid crafting and digital art
  2. Hybrid Crafting tutorials or links to some I have tried, and pictures of the results
  3. Some digital freebies or links to some great ones I have found.
  4. Occasionally some random off topic comments